No Filters! No Problem!
December 11th 2020
(Before I begin I would just like to point out that there's no real substitute for a good filter system. the techniques below will help you achieve similar results but will take a lot more work, both in time and effort than you would be able to get in camera using a good filter system. this blog is not to dissuade using filters, just to simply show you what you can do when you do not own any.)
If you’re a landscape photographer and find yourself out in the landscape on a regular basis then there’s a very good likelihood you have a filter system of some type nestled in your camera bag. Wither this is a full system with all the ND's, Grads, fog filters etc (there's a long list! ). Or if it's just a filter holder system with one or two filters you have or perhaps it's an array of circular filters then you’ll know just how useful they can be to help get it right in camera and just how much of a time saver they are when it comes to post processing your RAW images.
But, if like myself you find yourself being a landscape photographer on a budget and also like me haven't gotten around to getting yourself a filter system yet then it really isn’t as much of a problem as you may think. With all but the exception of a CPL Filter (Circular Polarising) Filter, you can overcome many, if not all! the issues that a filter system can help you get right in camera. (all be it with a little more work, time and effort)
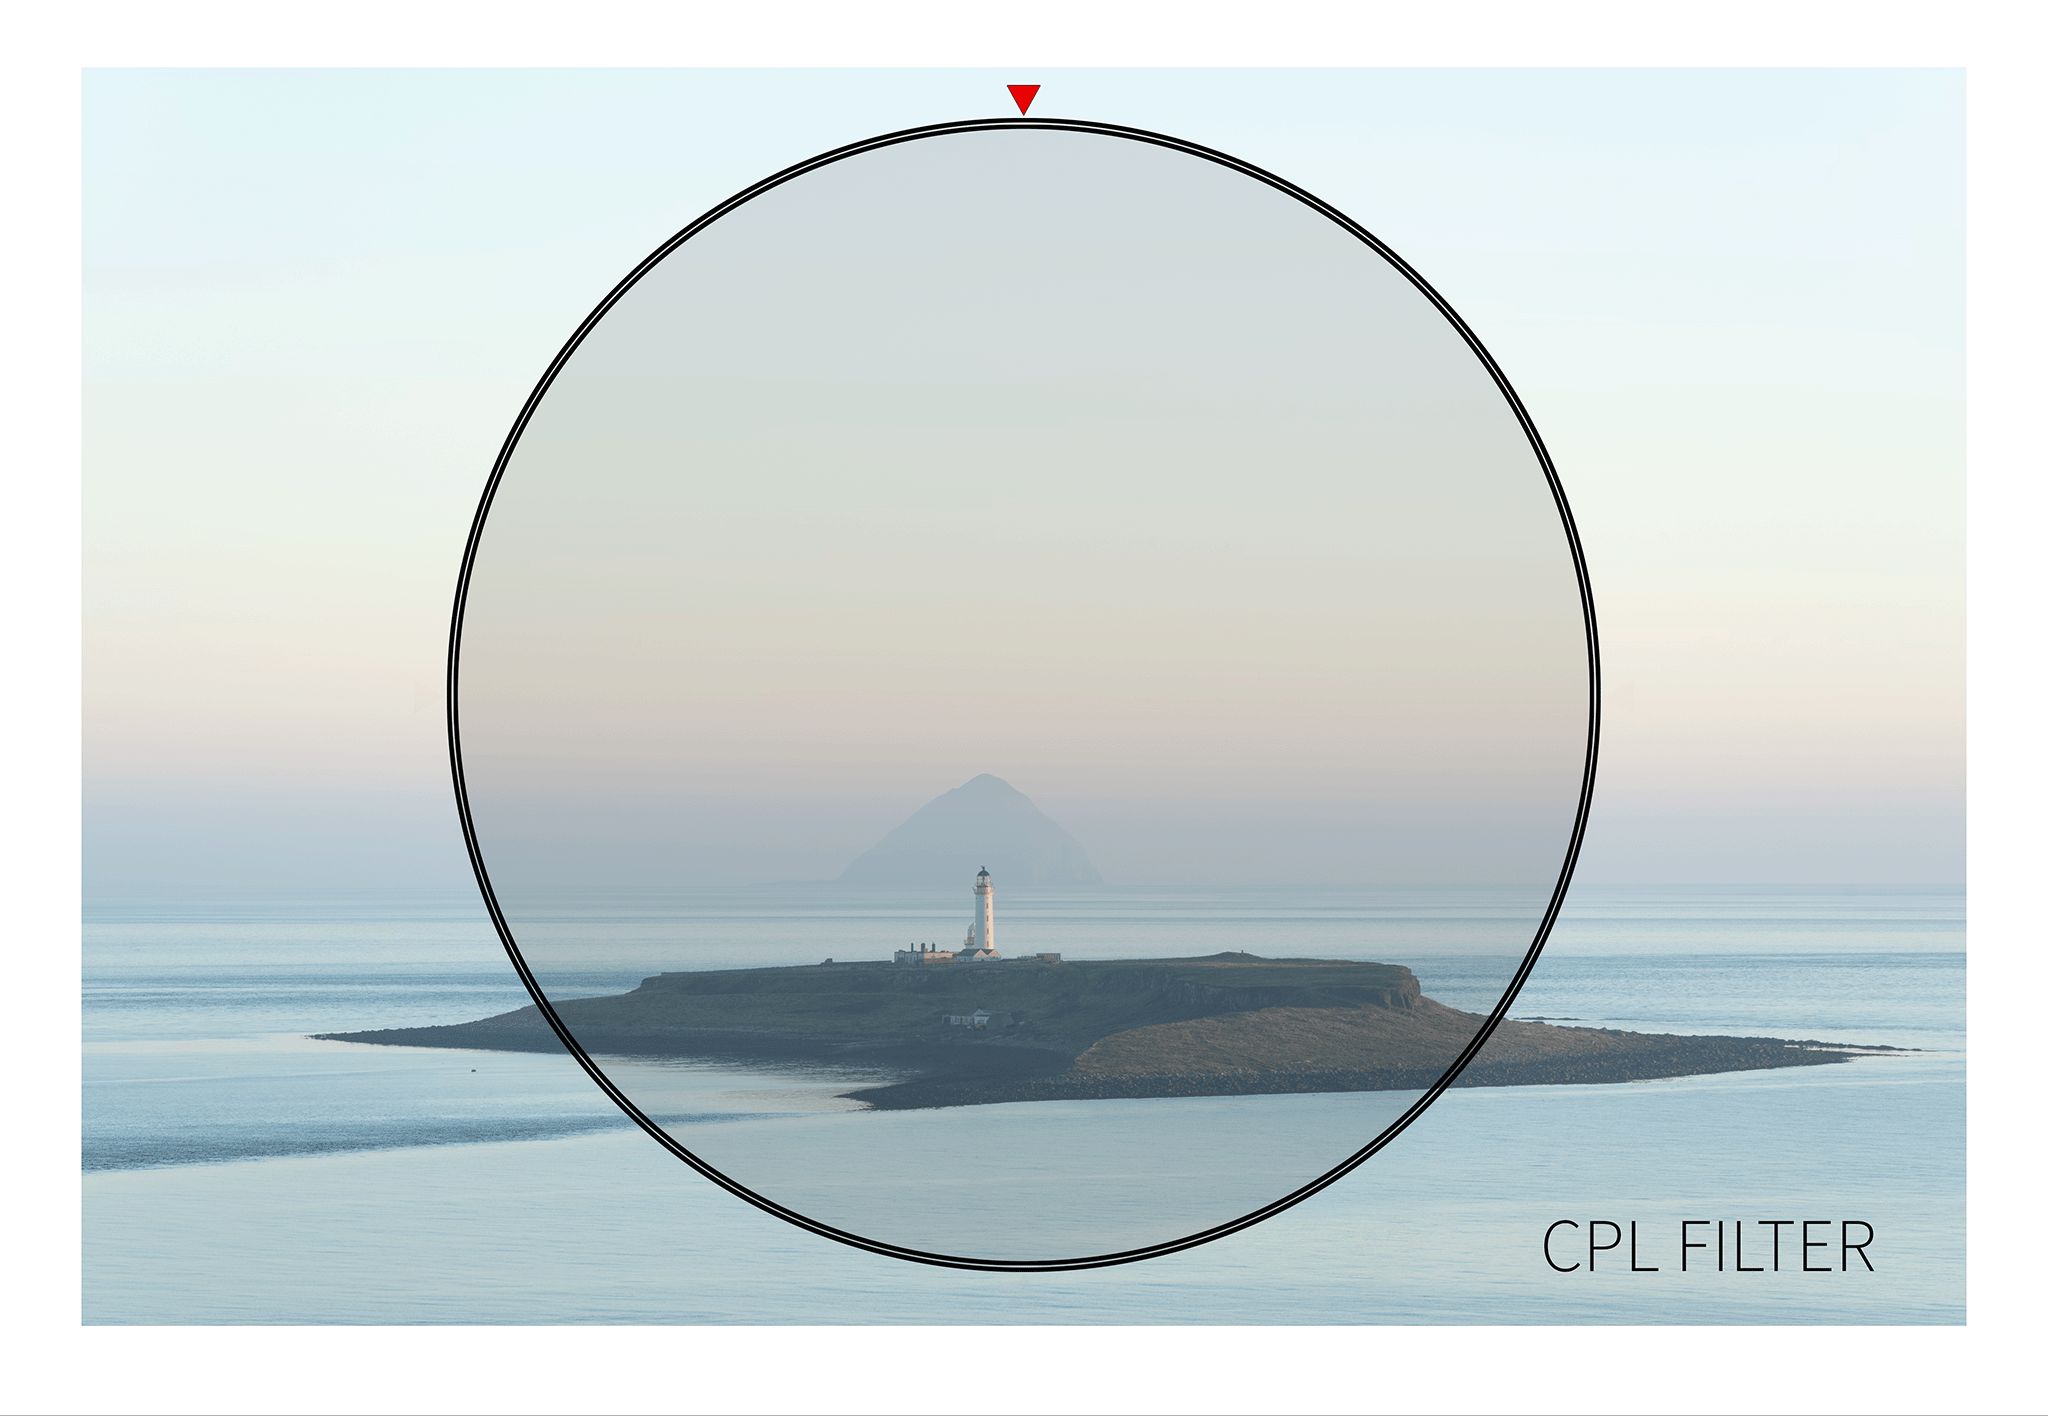
I was once asked, “What (if any) filter could you not live without”? the answer I gave as probably many other photographers would! Would be a CPL! a Polarising Filter is the only filter that I can think of that’s function can’t be recreated in post-production. Removing reflections from water and glass can be done in post but revealing the true detail behind those reflections is a near impossible task to do effectively and realistically. So, If I was to give any advice on a must have filter, I would have to say categorically that it would have to be a CPL I would advise anyone to get. (What brand?) That may be something that you would have to research on your own, as mentioned above I've been working on a budget so I don’t have much knowledge or had much (if any) use of many of the major brand CPL or other filters, so unfortunately I can’t offer up any reviews or practical first hand advice on what filter might best suit your need. All I can really suggest is that you get the one that best suits your budget that has the best reviews that are already out there.
This blog post is more to offer up some alternative techniques to use when you don’t have any filters to hand.
Before we get onto one or two of the techniques that you could use in place of filters lets have a closer look at why I love the CPL so much and why it’s the only filter (That I know of) that can do the job that can’t be replicated in post-production.
No Filter v CPL 0%
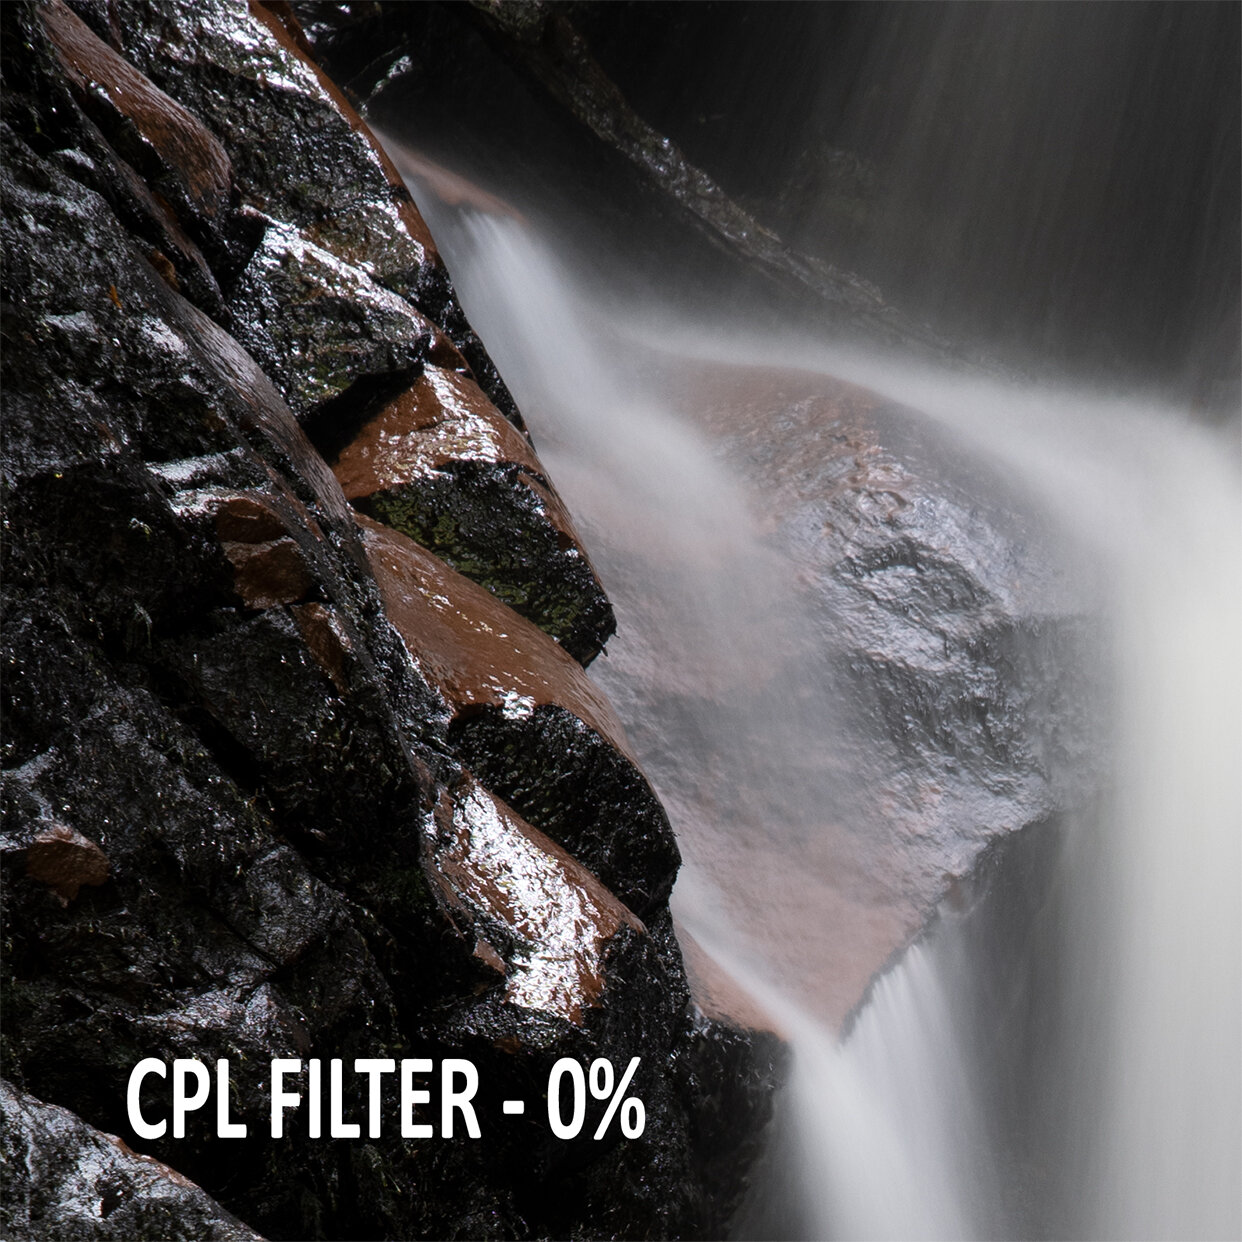
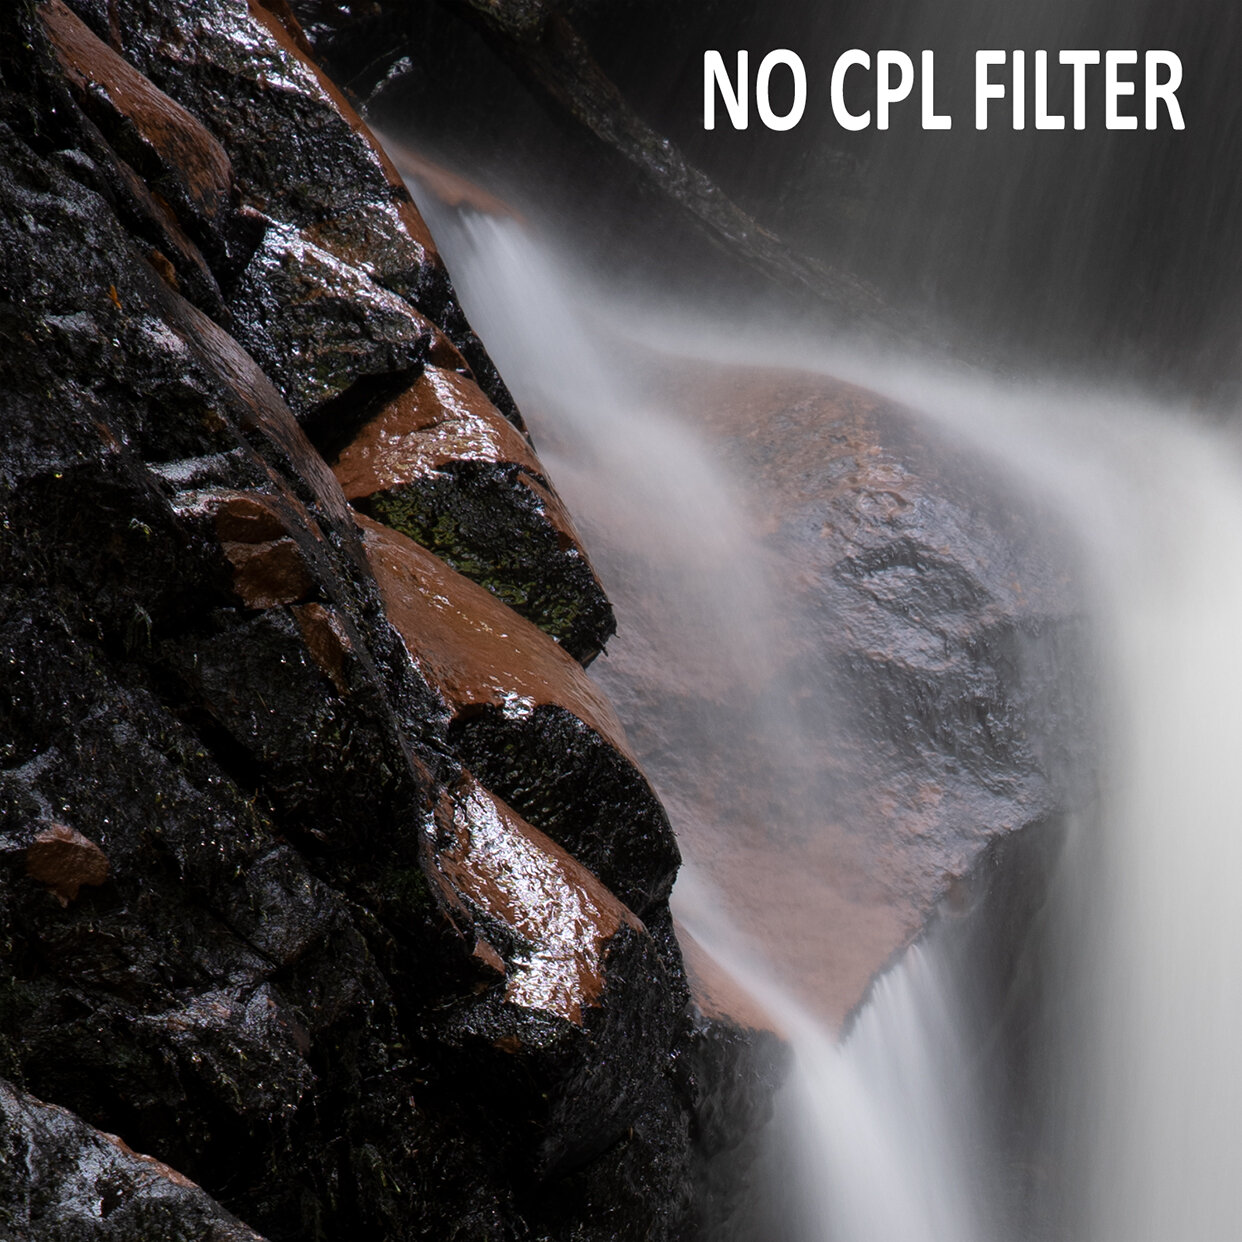
You may notice here that once I added the Polarising filter to the lens it created even more reflective glare on the rocks than what was showing before putting the filter on.
The added glare when adding the filter may seem counter intuitive to anyone familiar with polarisation and polarising filters but the reason for this is that the light coming from one direction is favoured over all others when polarizing the light with a CPL, and in this case the light from the overcast sky was favoured over the rest of the reflected ambient light creating more contrast but also creating more glare on the rocks and washing out some of the colour of the rocks at the same time.
CPL 0% v CPL 100%
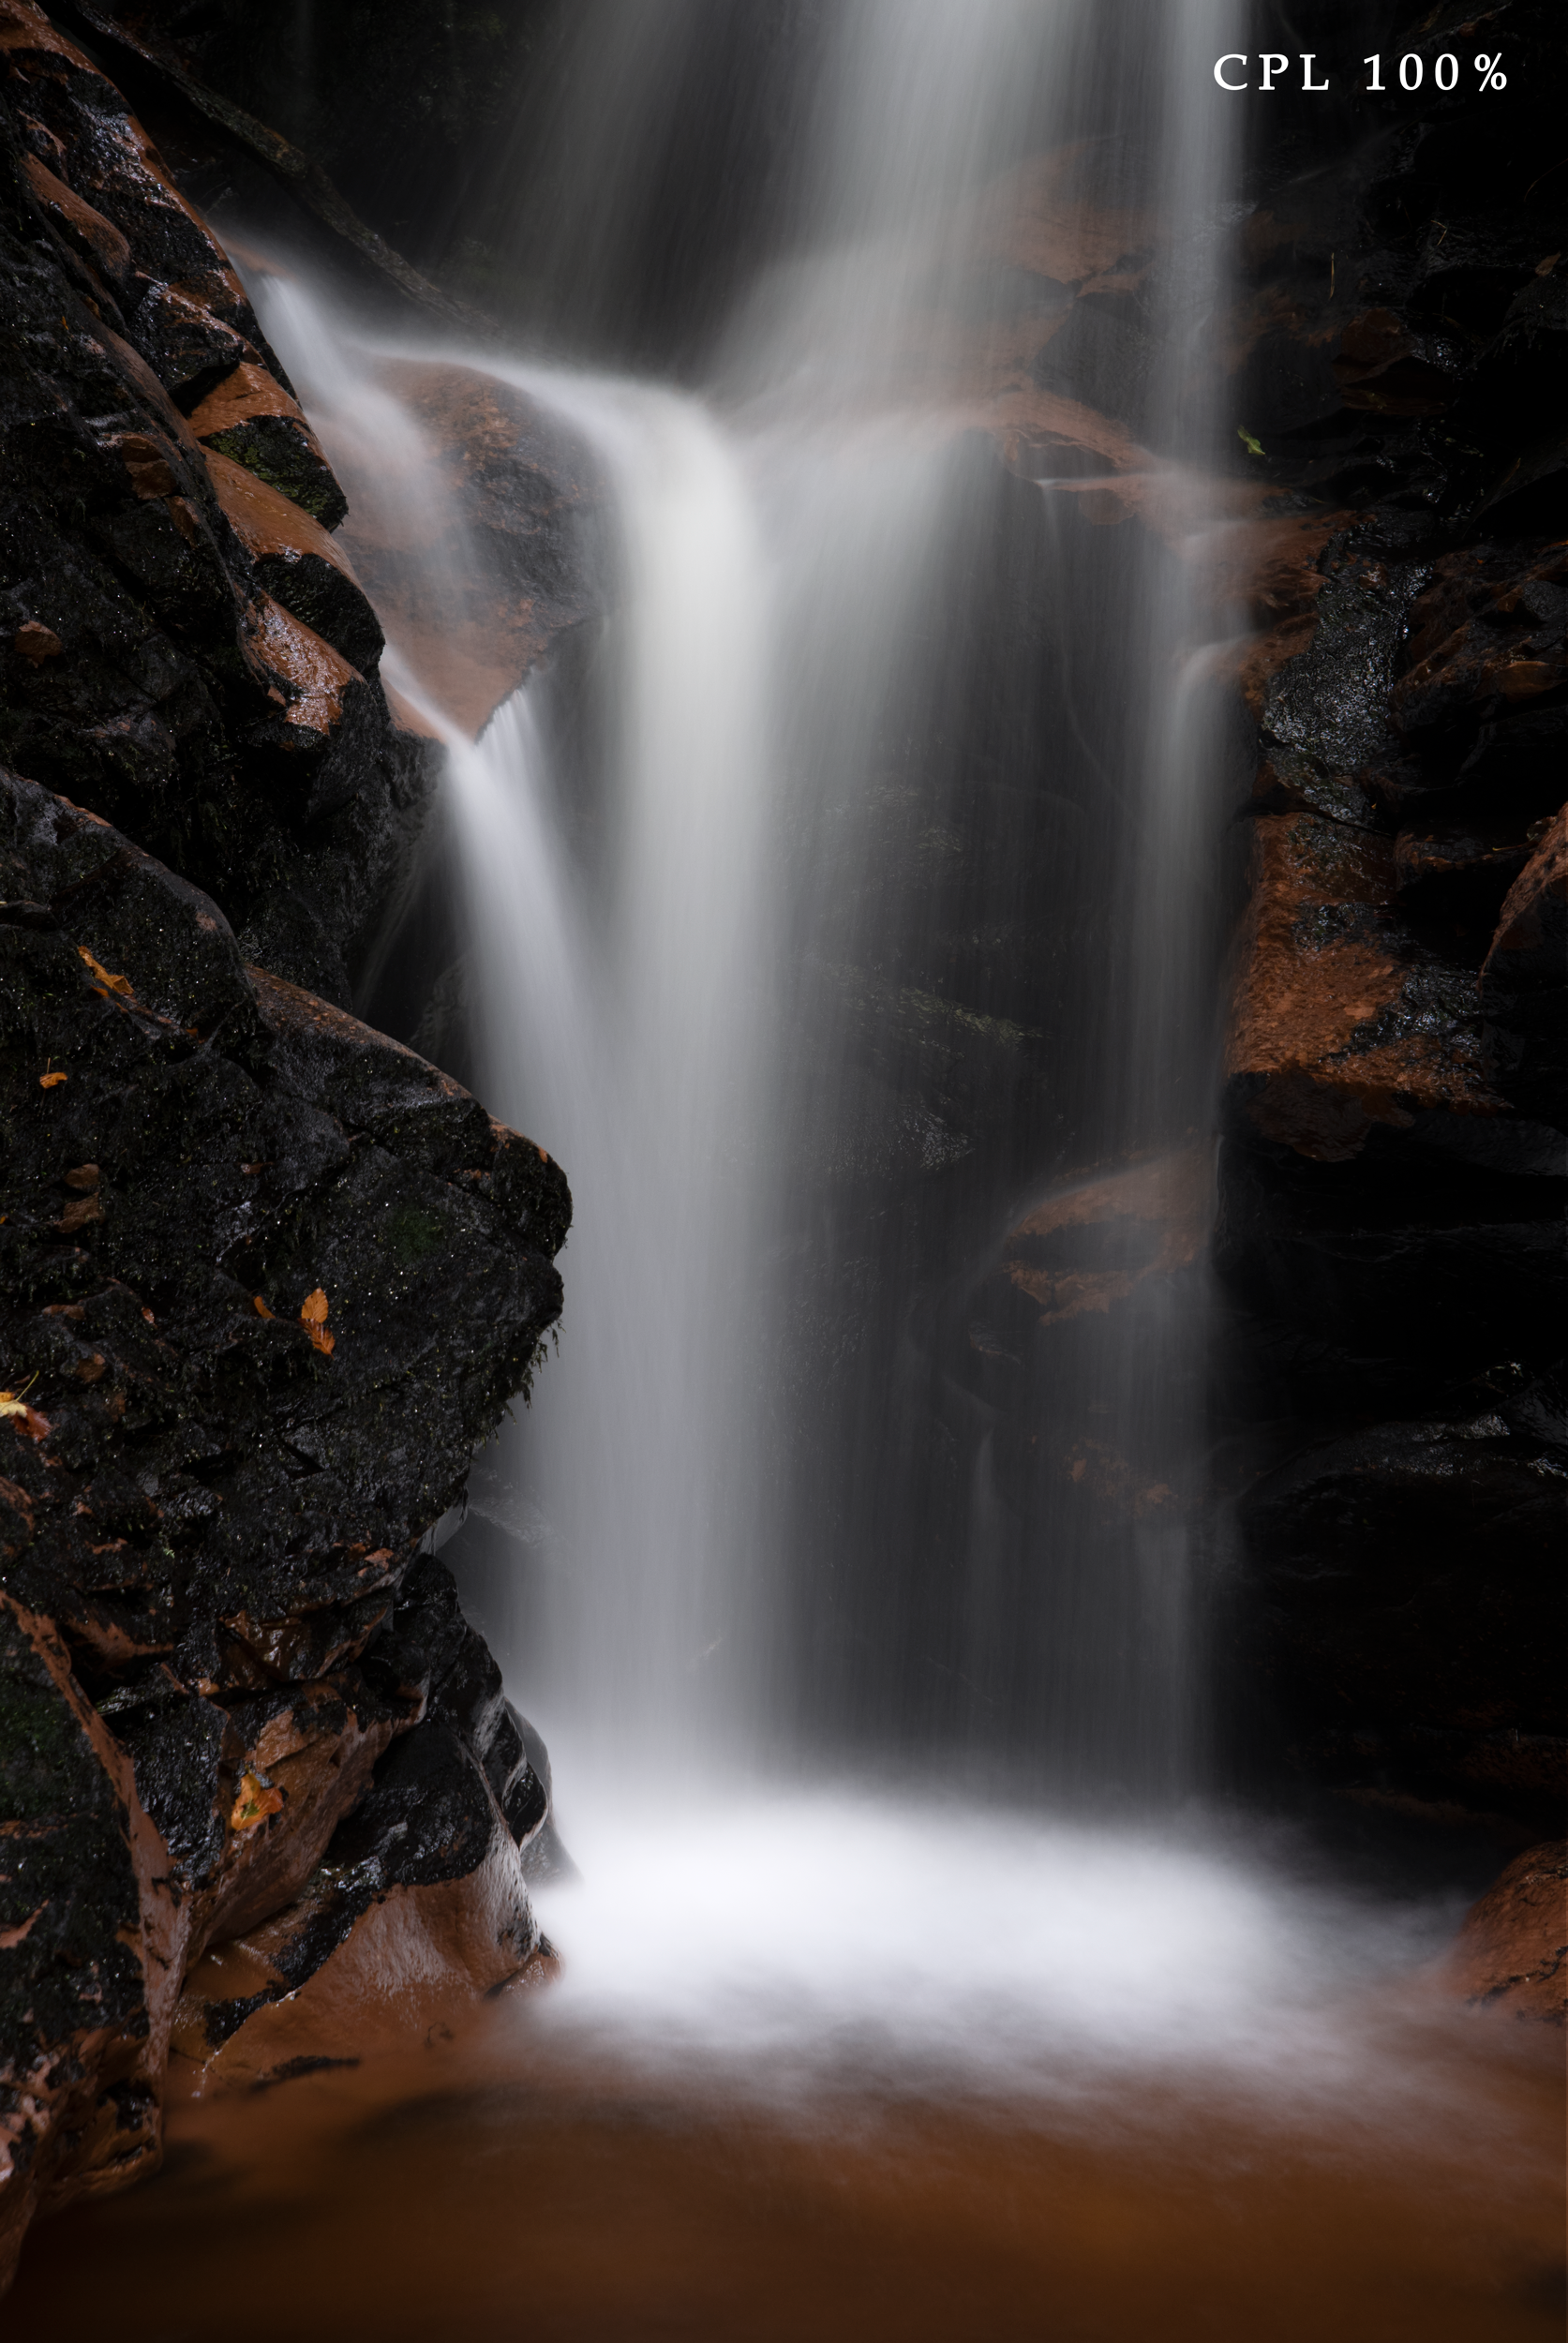
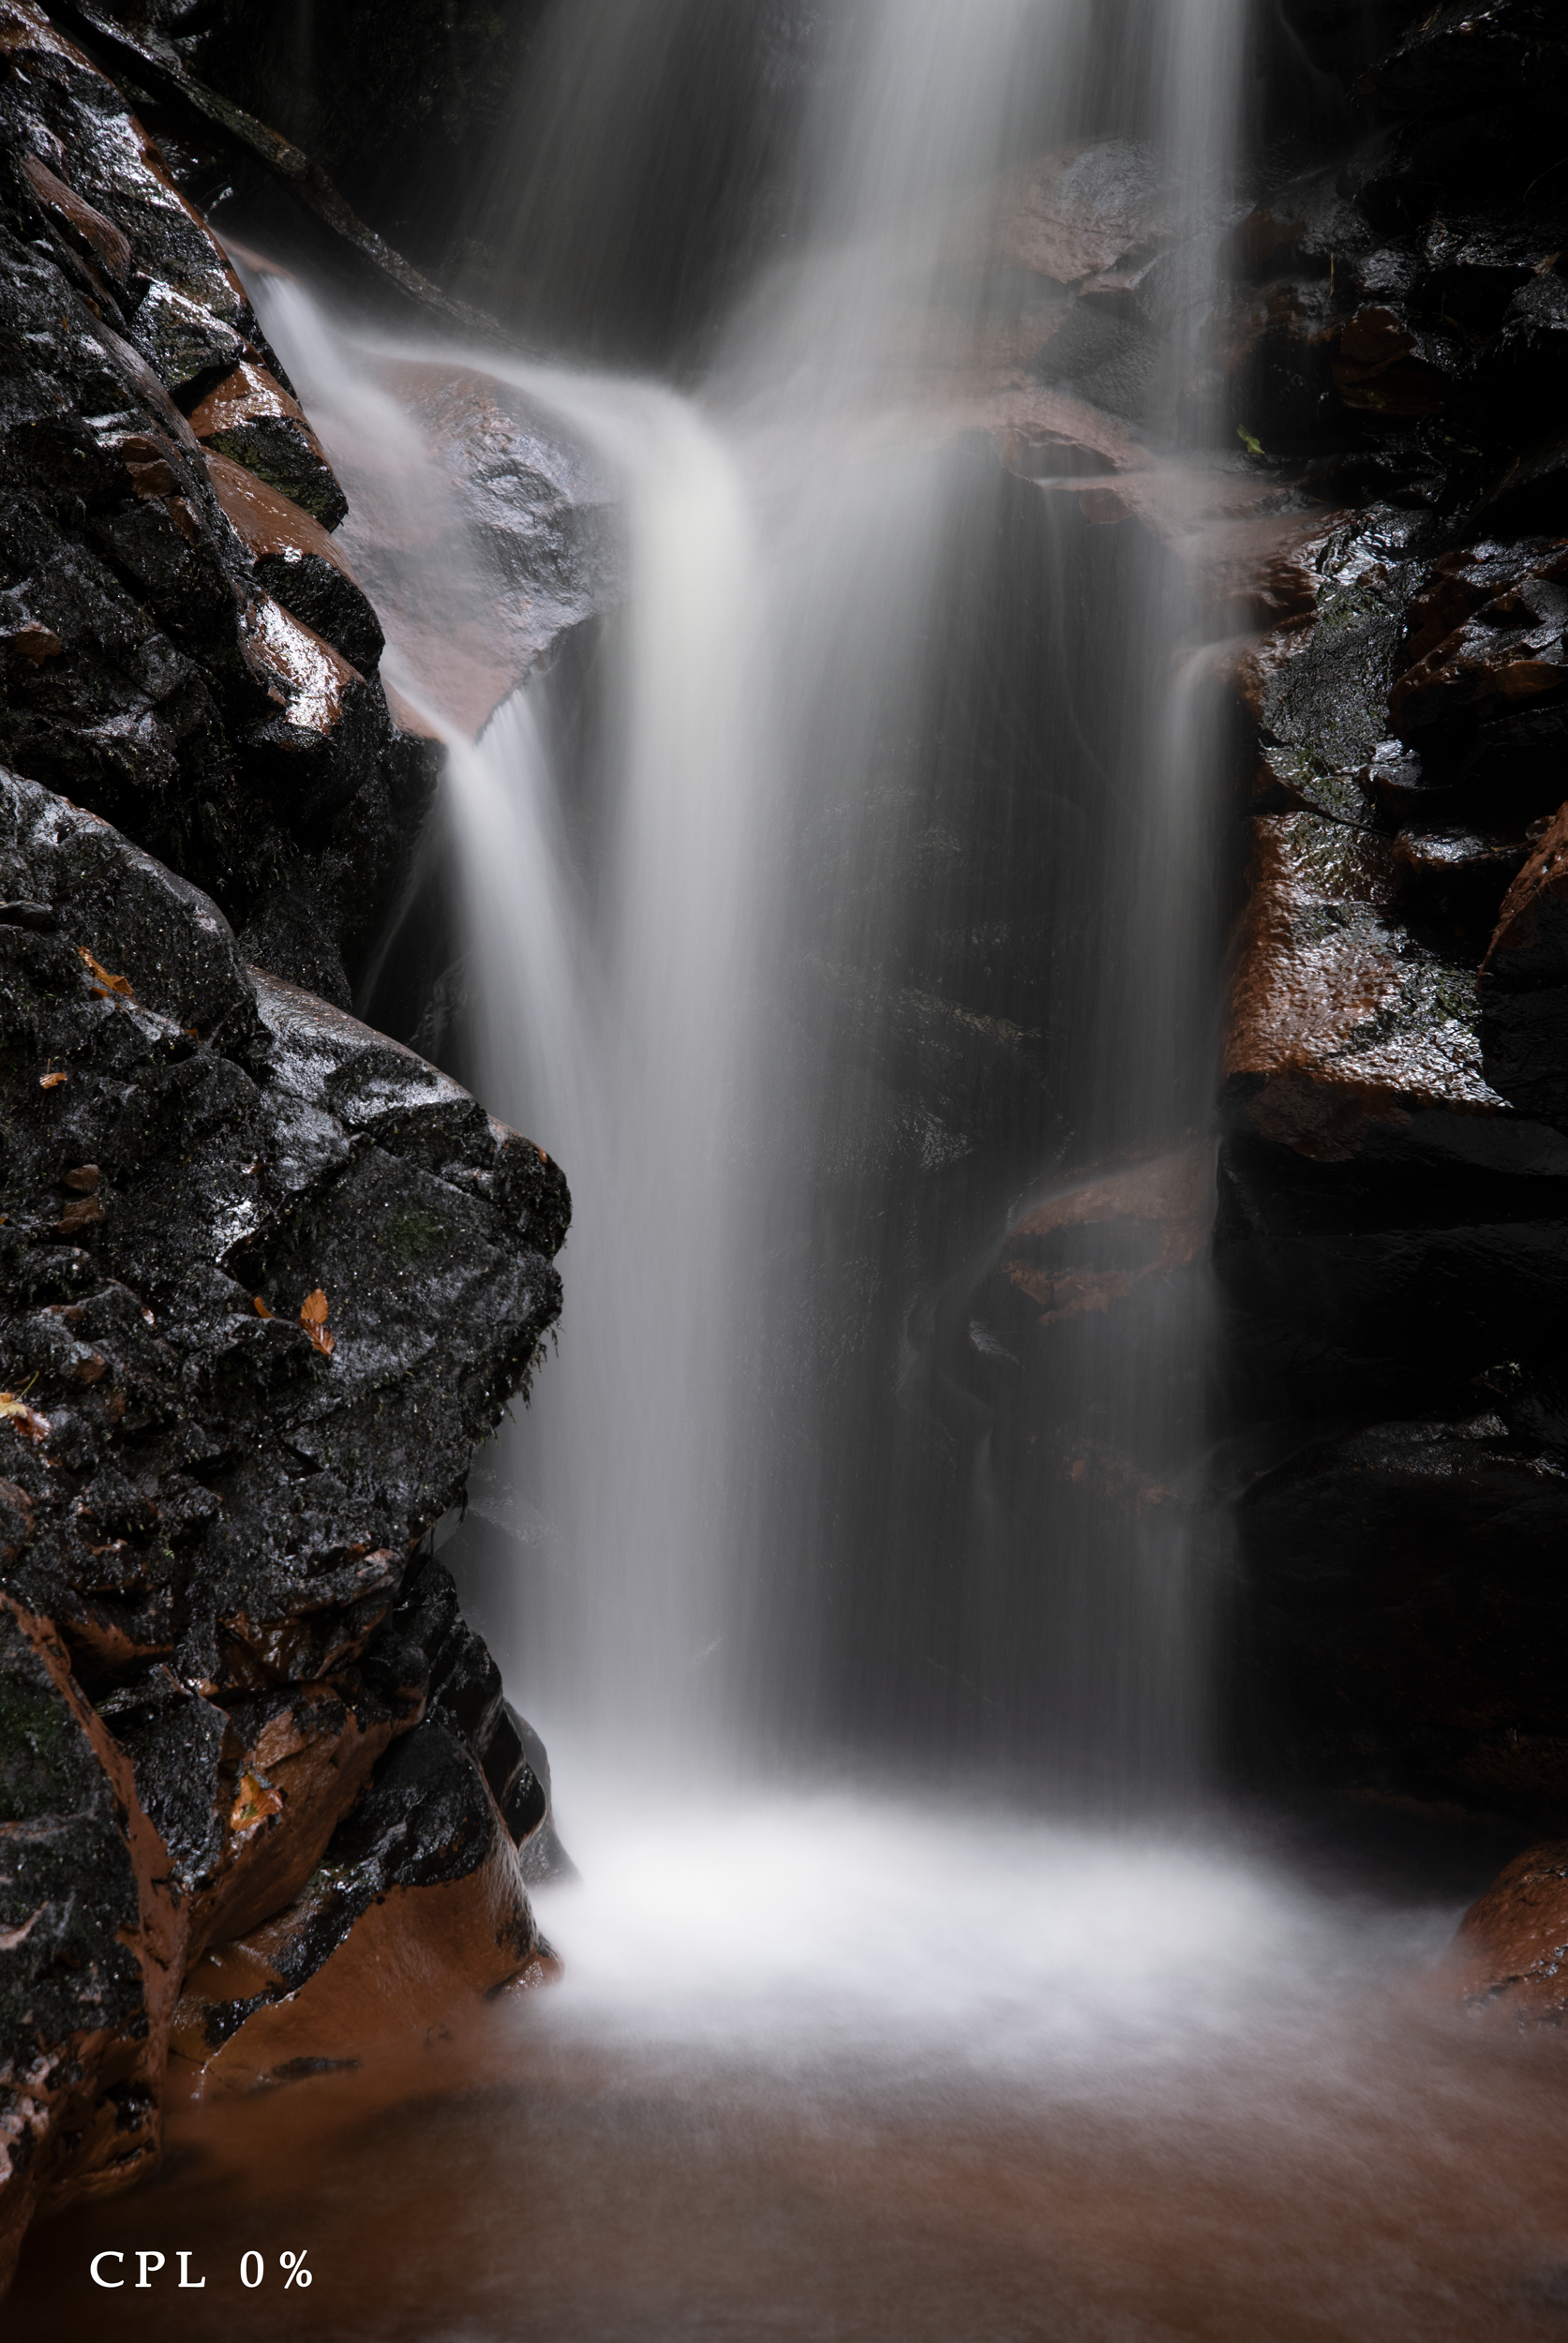
This is where you see just how much difference a polarising filter makes to the overall finished photograph. How much control it gives the user to choose which direction of light coming into the scene is chosen, This in-turn gives a degree of control of the overall amount of light in the final photograph. The light in the scene stays the same throughout the two shots but the amount of light captured in camera is completely different.
The decision you’ll have to make when setting up to take a shot in a scene like this is,
“Do the reflections help or hinder this shot?”
This of course is subjective and will also change from scene to scene, what you chose to do with the polarising filter can change the composition by changing the direction and amount of light within the scene. So, you’ll have to make a conscious decision wither you want to add the filter and how much polarization you want if/when you do add it.
Now that we’ve seen what you can do with a polarising filter let’s move on to the actual purpose of this blog. What you can do when you have no filters with you but would like to capture say….a long exposure but you have no ND filters, or a high dynamic range sunset/sunrise but have no ND Gard filters with you. Long exposure is an easy one to get around, so we’ll start with that.
But before I do move on, I really need to give a shout out to (Kelby one) and more specifically the Kelby One free e-book (I'll leave a link to the e-book below)
Long Exposure without an ND filter
I just downloaded the e-book last night and picked up a tip that simplified one of the processes I was going to add to this blog showing how you could stack multiple images into a smart object, change the smart object blend mode and create a long exposure shot without the use of an ND filter. But before going through the streamlined tip I just picked up with you I’ll quickly run through the process that I used to use to create a long exposure shot
Normally for creating a long exposure shot without the use of an ND filter I would take several frames (preferably on a tripod as this will make aligning the shots a lot easier when you get them into photoshop). You can take anywhere from 10 shots to as many as was required, in this case I took 20 frames of the waterfall in quick succession using the shutter release and setting the camera to continuous shooting mode.
Long Exposure using ‘Mean’ stack mode
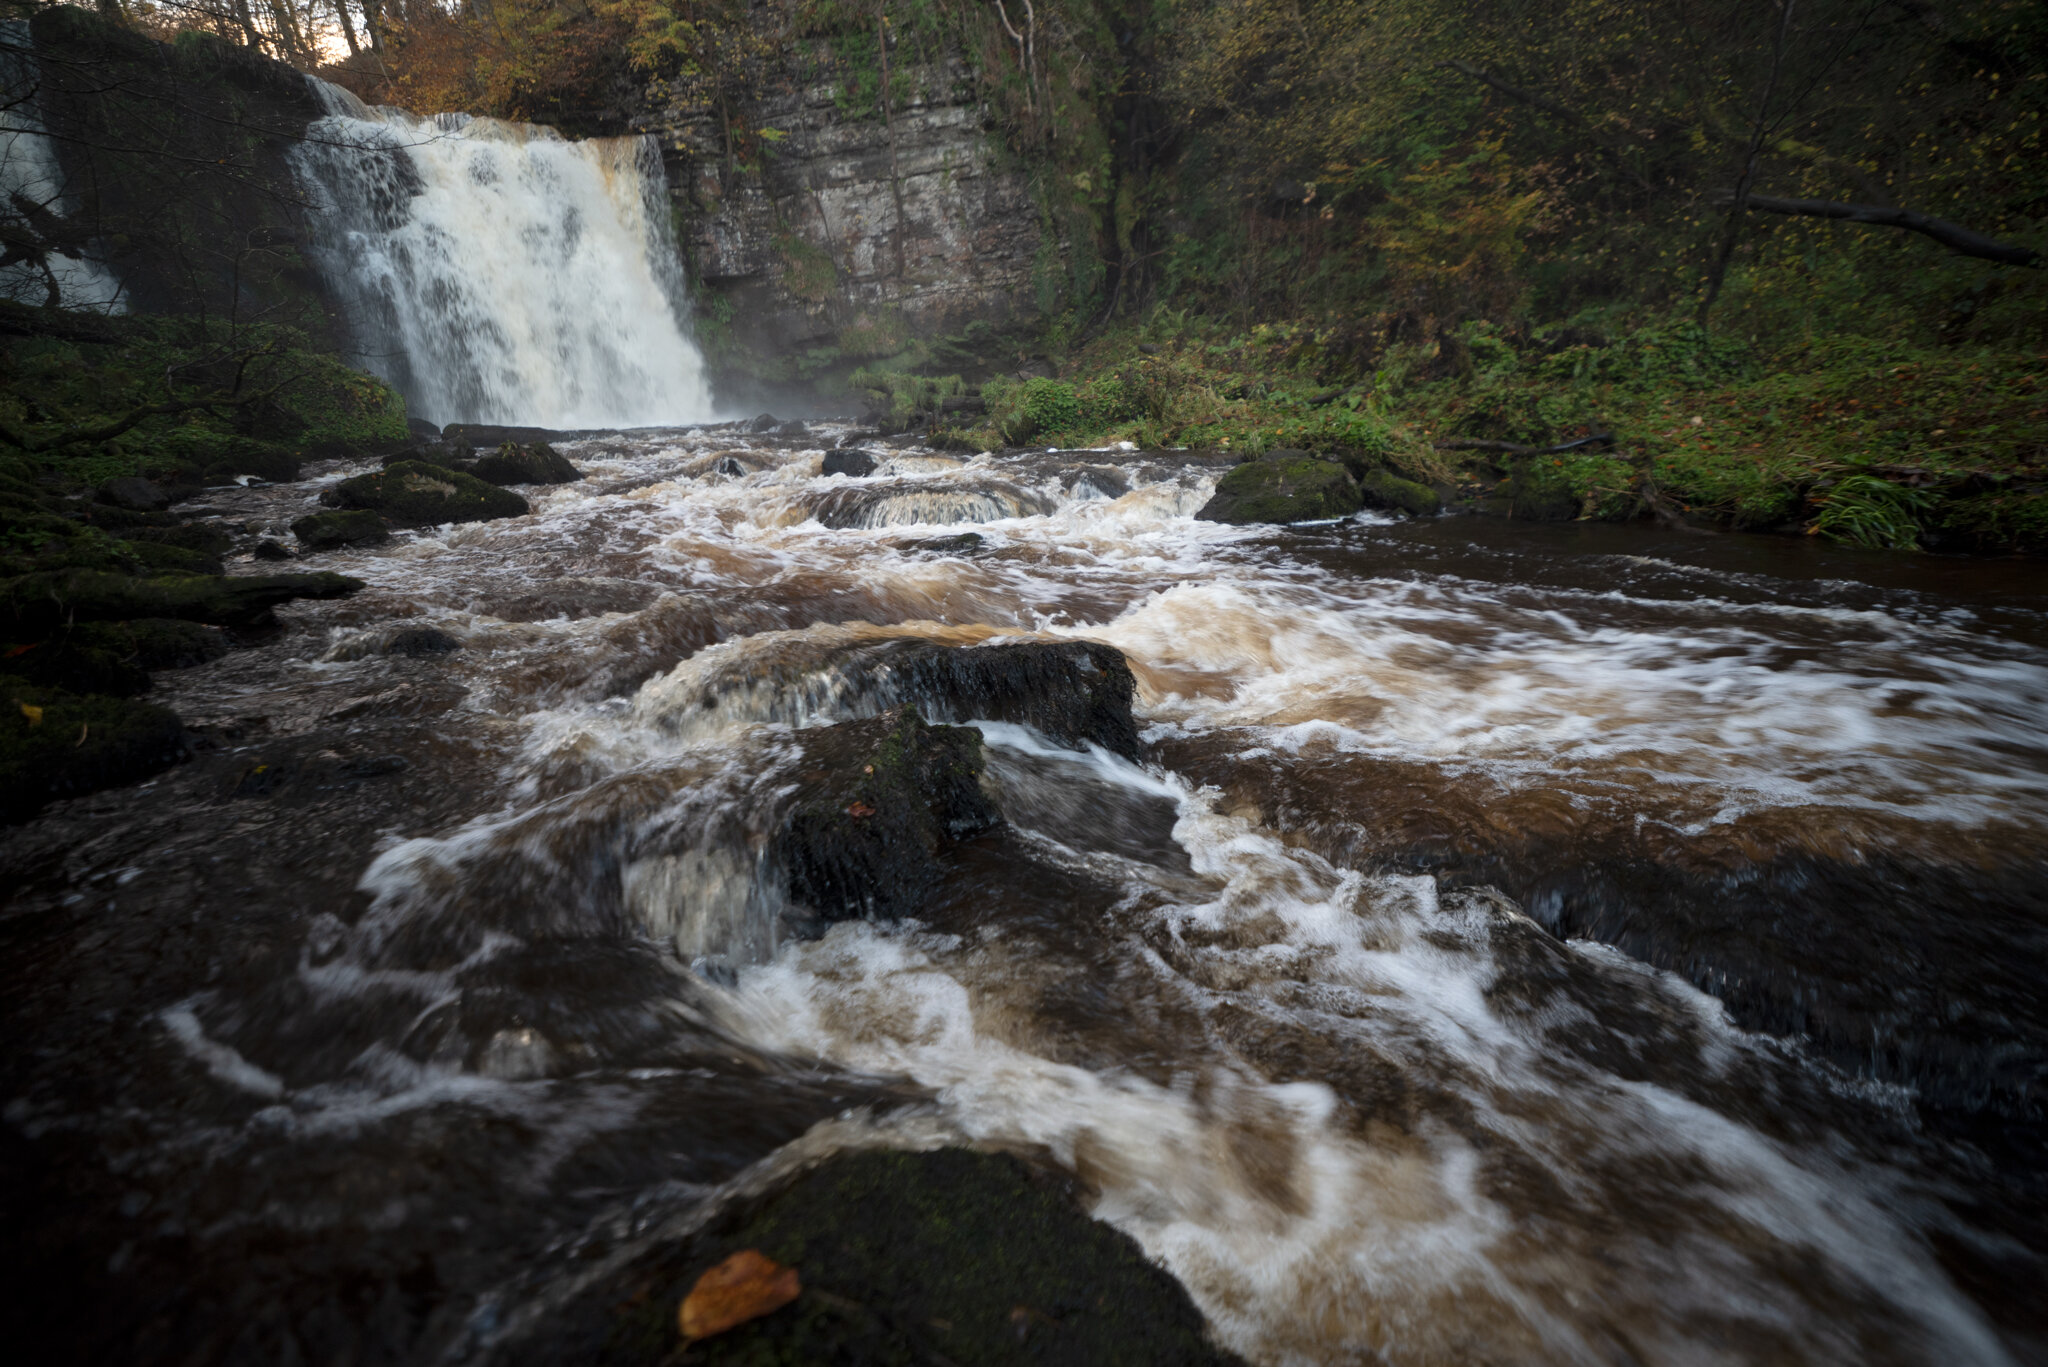

Single shot v 20 tacked frames using a median blend mode
To demonstrate this next example I went up to a local waterfall and set the camera on a tripod and took 20 frames in order to stack on top of each other and convert to a smart object. Here are the 20 individual frames.
As well as the 20 individual frames I also took a single longer exposure as a comparison, above is the three side by side. One of the single shots, the stacked shots and the long exposure shot, In all honesty I prefer a single long exposure as it tends to be smoother, but that being said, the more single frames you shoot and stack the smoother your finished image will be .
So to get started (after collecting your frames) all you have to do is follow the steps below.
If you like: here is a link to the frames that I used in the event you want to follow along just to get the practice before going out and getting your own shots. (forewarned! they're not the greatest of shots, they were taken in a hurry just to demonstrate but I plan on heading out and redoing these shots with better examples and will update when I do, so watch this space)
https://1drv.ms/u/s!AjuwODvk-6xrgc9yk5DYNaJFgZdnog?e=olAd8U
1.) Navigate to the folder where your files are held on your PC, external hard-drive or SD card
2.) Find the frames that you plan to use for stacking. [Tip] If you notice here I’ve taken a photo of the lens cap at the beginning and the end of the sequence, This is not essential but really helps to find groups of photos to be used in a sequence either for stacking or for stitching in panoramas. It’s a good practice to take these marker frames as it saves so much time later when sorting through your photos
3.) Select your fist frame in your sequence and open it in photoshop
4.) When you have your first frame open in a document window in Photoshop (1.) select the rest of your frames and drag and drop them onto that window in Photoshop that you have your first frame in. (making sure to drop it onto that window and not onto the Photoshop main panel as this will open all of the frames as individual document windows) (2.) dropping them into the open document window will put all of the frames into layers on that open document window.
5.) If you have new layers set to open as smart objects in Photoshop simply select all of the layers and right click over any one of them and select Rasterize Layer or go up to the top dropdown menu bar and select ‘Layer/Rasterize/All Layers’ and this will turn all of the layers into rasterized layers which is needed for the next step.
6.) Once you have rasterized all your layers you will be able to ‘Auto-Align Layers’ them. If you use a tripod on a steady surface, you might not need this step but in this case, I had my tripod legs in the water, and this might have nudged the frame just a little. ‘Auto-Align Layers’ will take all of the layers and match up all of the pixels in each frame that are the same as the frames above an below so will help to make sure all of the frames are aligned properly giving a better cleaner stacked image.
7.) When you have aligned your layers select them all and go up to the top drop-down menu and select ‘Layer/Smart Object/Convert to smart Object’, this will (as it says on the tin) convert all of the frames into a single ‘Smart Object’. (If you’re not familiar with what a smart object is. They’re magical little objects that are files within files and can do so many things, but way too many to get into in this blog post. I’ll try and get around to writing a post about smart objects soon but in the meantime, I would strongly advise looking up the benefits of using smart objects).
8.) You now have a Smart object containing all the 20 frames from before in a single layer and now comes the fun part. On the top dropdown menu select ‘Layer/Smart Object/Stack Mode/Mean’. This will allow all the average pixels in each given layer to show through in the smart object. Perfect for simulating a long exposure shot and great for reducing noise when forced to use a high ISO in a low light situation and you don’t have a tripod with you. (I’ll run over that use a little later in this blog)
9.) And this is the simulated long exposure shot you get using 20x single short exposure frames stacked on top of each other as a ‘Smart Object’ and set to ‘Mean’ stack blend mode.
Script/Statistics method
That was the way I used to stack my smart objects and for the purpose of this blog post/tutorial it took 9 steps to show how it was done. The new way I’ll be doing it from now on will only take 6 steps to show you, but, is so much quicker and simpler to do. This is the method mentioned before, the one I learned from that’s in the free Kelby One e-book (10 Quick Photoshop Killer Tips by Scott Kelby)
1.) With Photoshop open go up to the main menu drop down bar and select (File/Script/Statistics) this will bring up the ‘Image Statistics’ dialogue box.
2.) When you have the image statistics dialogue box open (1.) click ‘Browse’ and navigate to the folder where you have your (2.) images that you want to stack.
3.) Select all the images you want to stack together and click OK this will bring them into the Image statistics Dialogue box.
4.) From here you’ll be able to choose which stack mode you want to use. For the purpose of this tutorial I chose ‘mean’ Stack mode. (both Mean and Median can be use for the purpose of removing noise from images but I find that mean works better for stacking images for the purpose of recreating a long exposure shot) but try different ones just to see what you think for yourself. (2.) Also make sure to check the box to ‘Attempt to Automatically Align Source Images’ this will ‘Auto-Align’ all of the layers for you. Then click OK to open them as a stacked smart object in Photoshop.
5.) This gives you the ‘Aligned’ and ‘Stacked’ smart object with a ‘Mean’ stack blend mode that you can then go ahead and edit as a final image.
6.) Also please note that as a smart object you can click on the (1.) small document symbol on the bottom right hand side of a smart object layer thumbnail shown above and this will open the smart object in a new document window where you can (2.) add or remove any of the files used in the stack (useful if one of the frames in the stack have a blurred area that you would like to remove)
This is the image that I was able to create from stacking multiple photos together without the need of an ND filter. I have to be honest and state that I do prefer the real long exposure as it seems a little bit smoother than the stacked smart object image but by using more than the 20 frames you will be able to get much smoother results but might take just a little bit longer to process, but my point is really to show that when you find yourself in a situation where you don’t have a filter system you can still achieve smooth long exposure style shots of waterfalls, light trails and seascapes.
But I’m sure we can all agree! for all it’s possible to get a long exposure shot (and the more frames you take the better it will look!) There’s just no comparison to getting a single long exposure shot using a good Neutral Density filter (ND Filter)
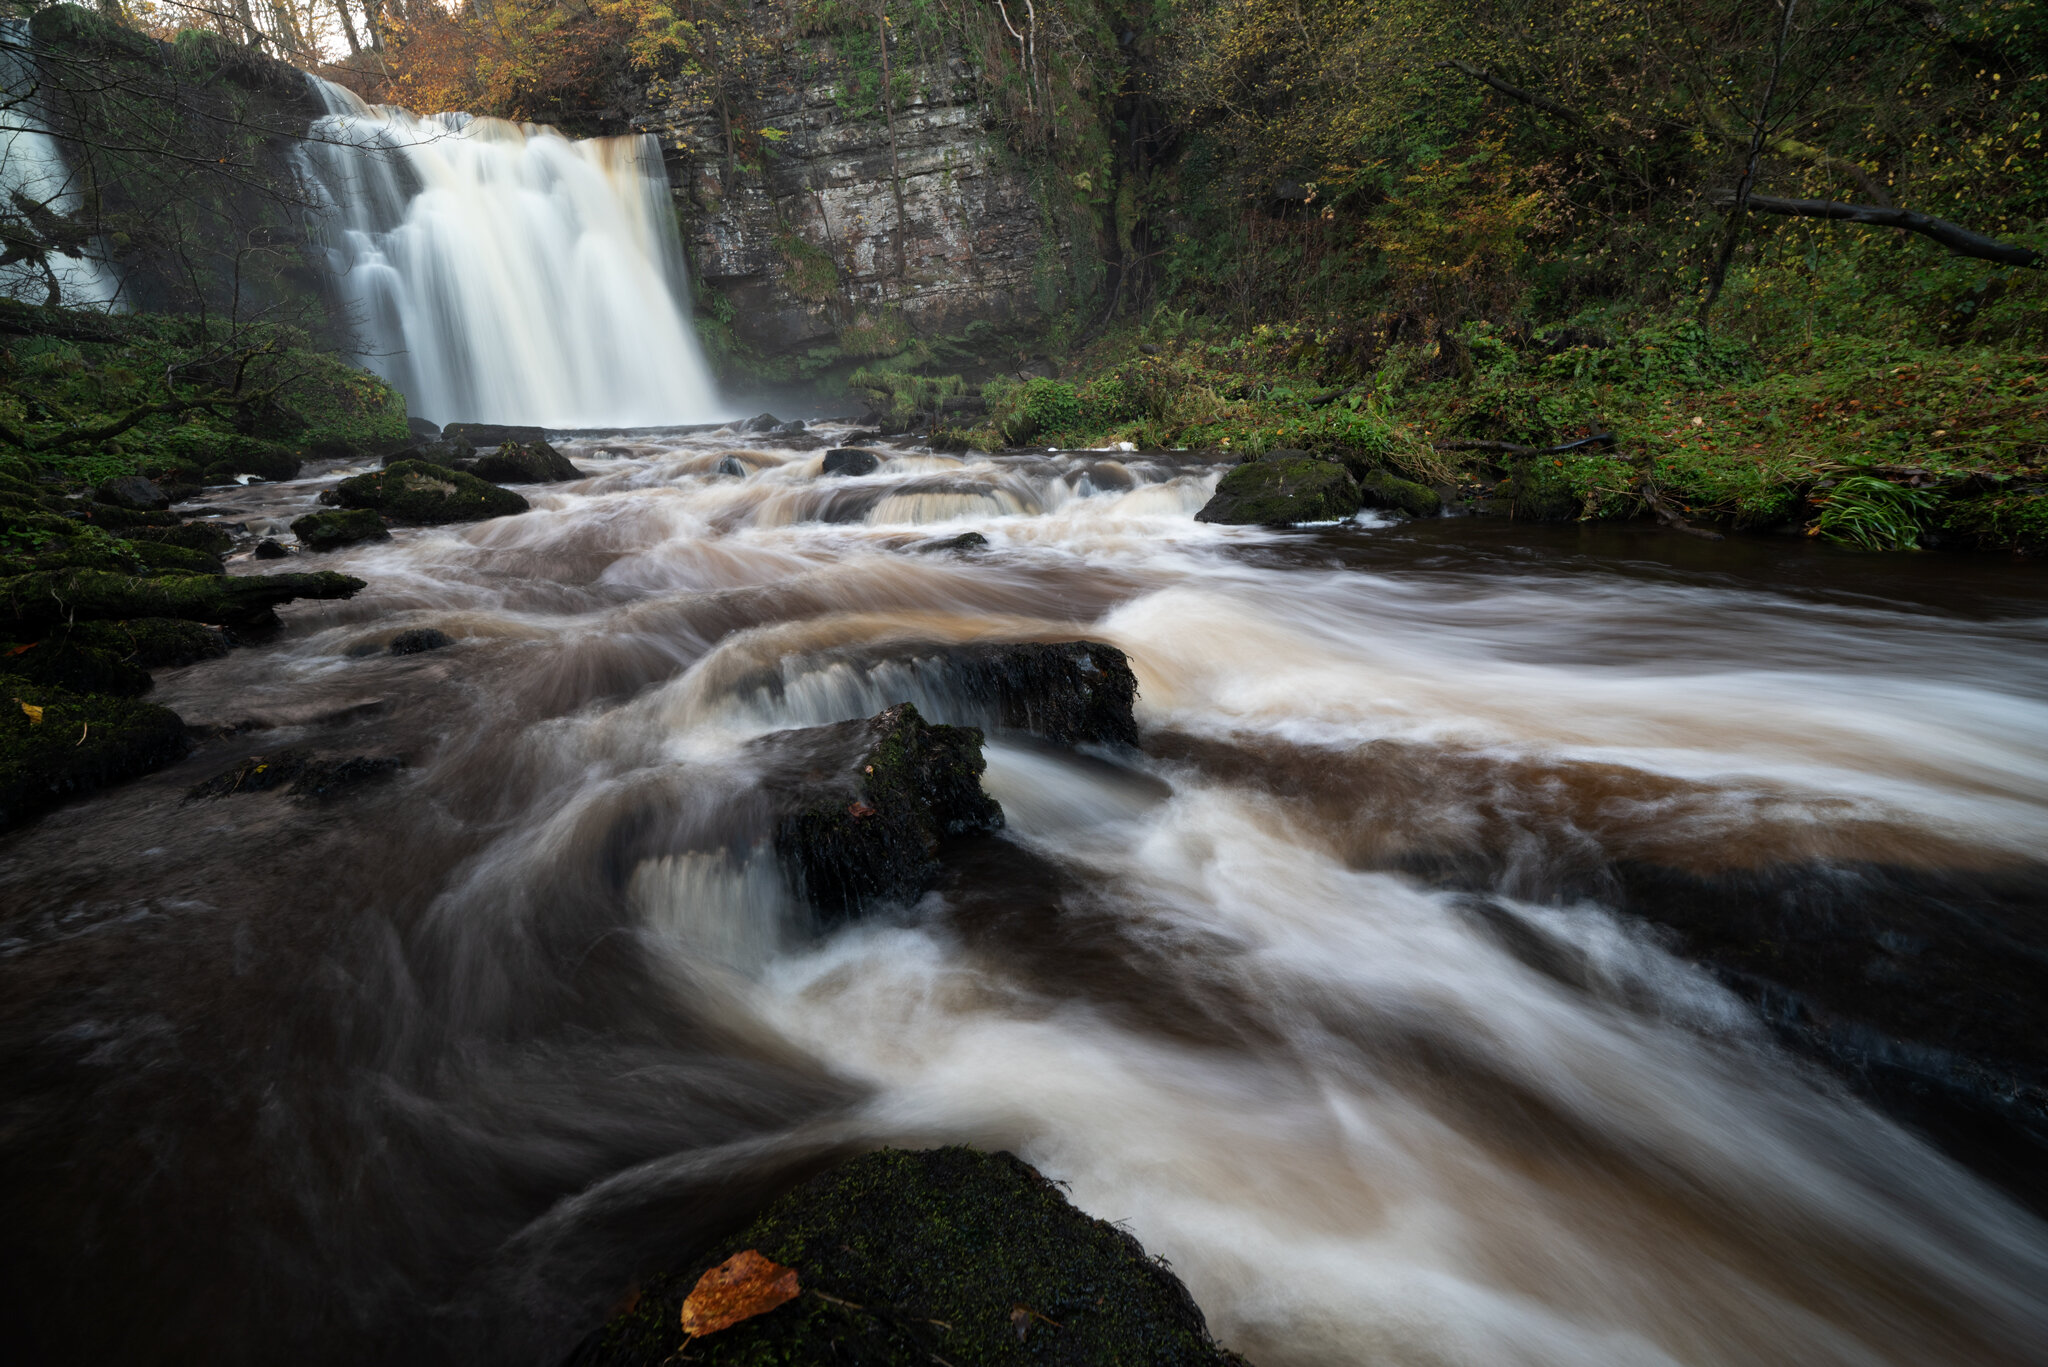
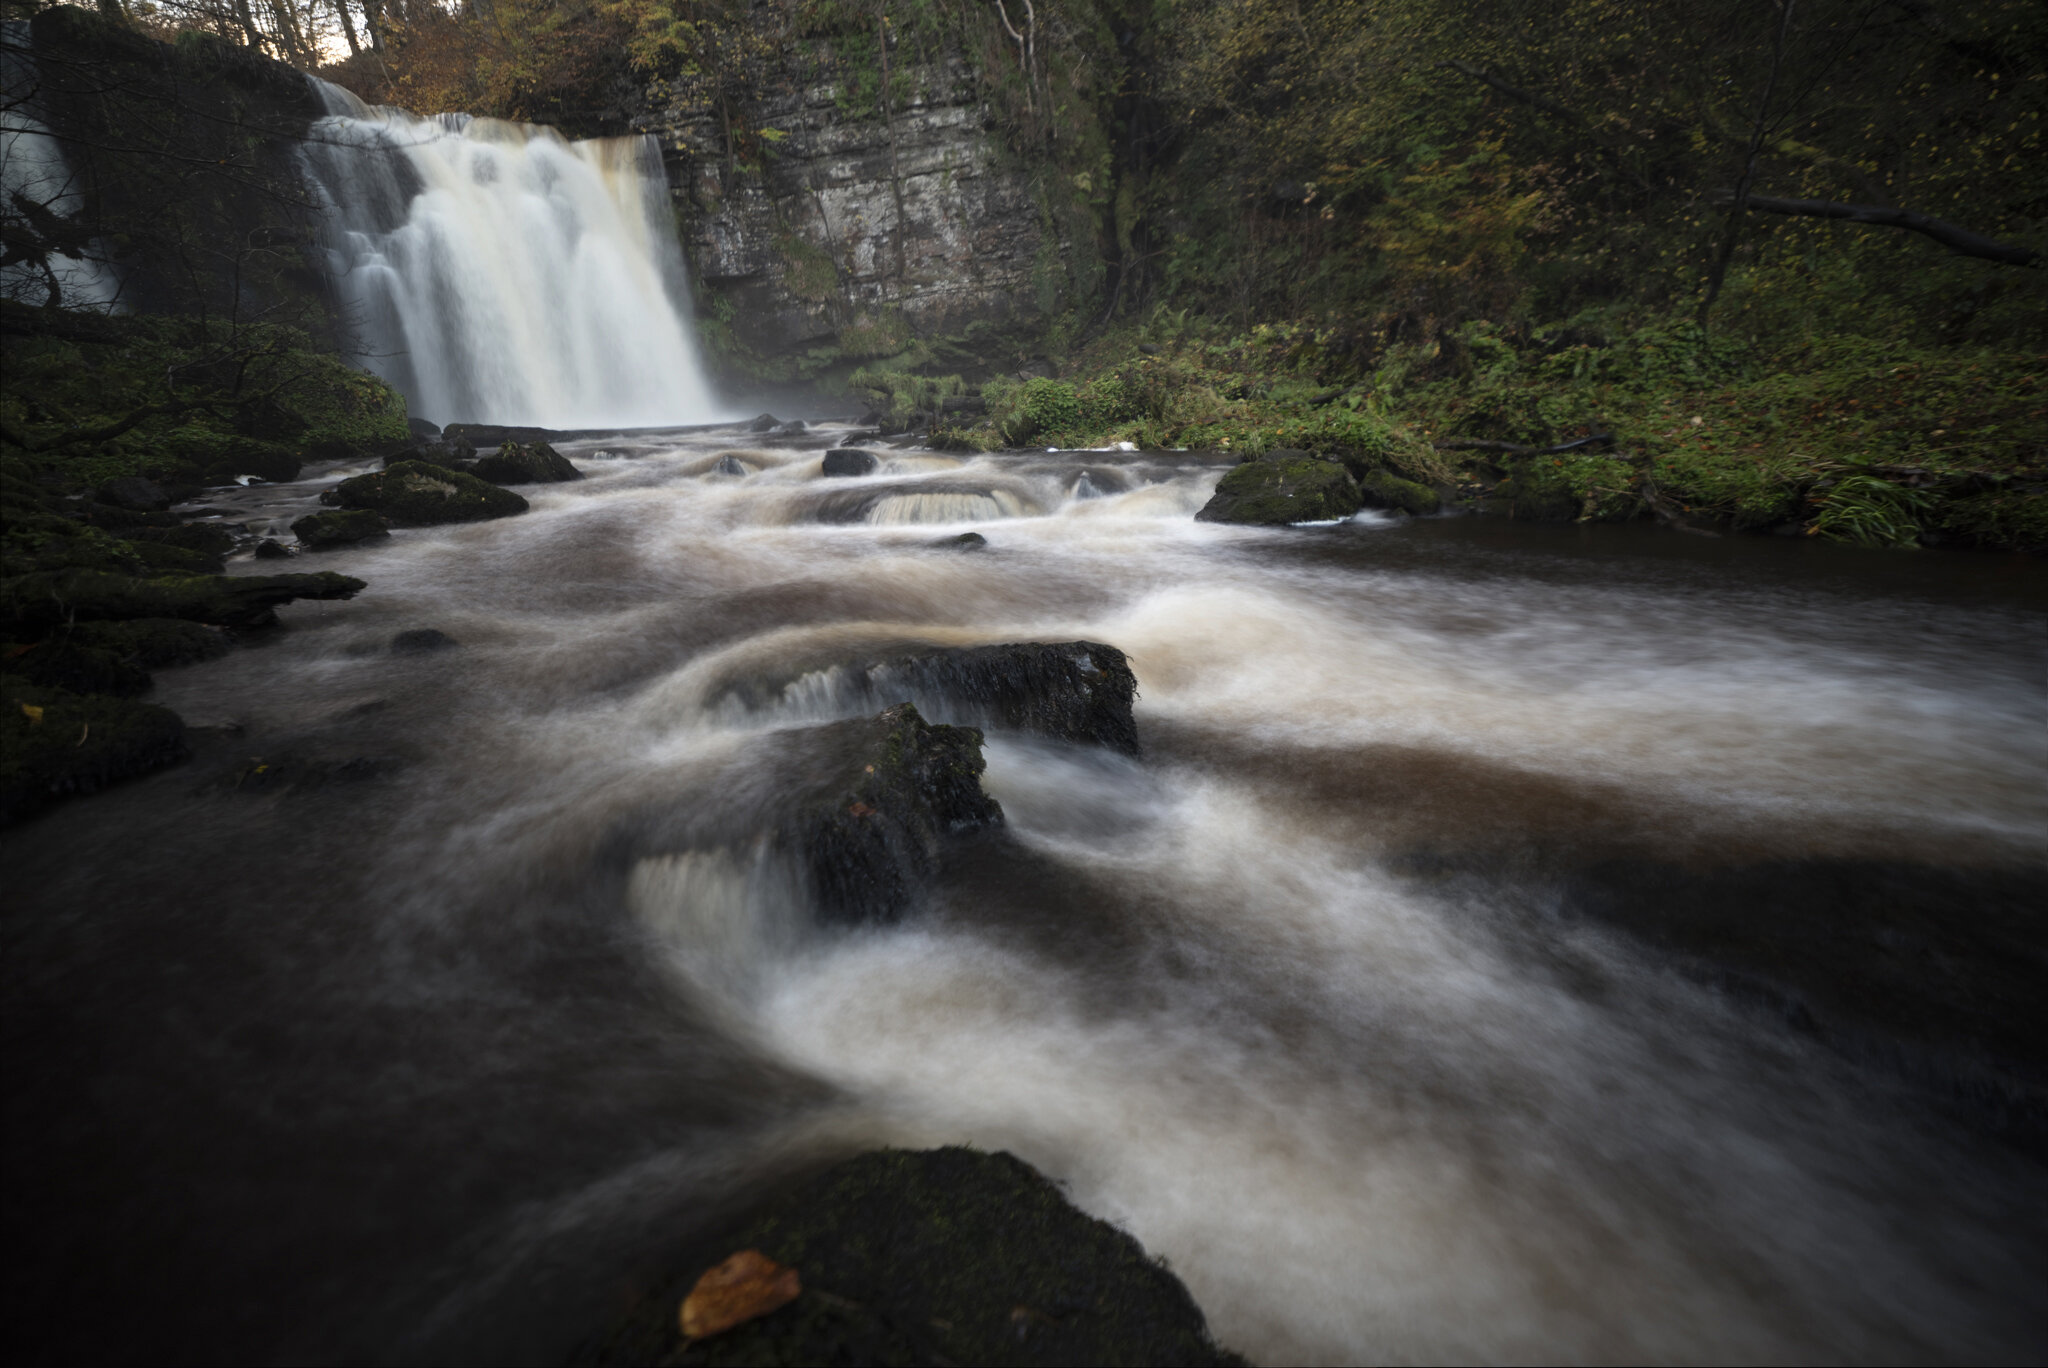
Single long exposure v 20 frame stacked
Noise Removal
Not Filter related, more just a side note. But the same way I stacked the image above to create a long exposure you can just follow the same steps for getting rid of noise in a high ISO situation. Open all the frames in photoshop. Once you have your frames ready to be transferred into photoshop just select the first frame, (drag and drop into photoshop) or (right click) and open with, photoshop. This will open your photo in Photoshop as the background layer or as a smart object depending on what you set your images to open in photoshop as. (I always set mine to open as a smart object). When you have your first frame open in photoshop all you have to do is select all of the other frames in the sequence in your folder and drag and drop them all on top of the window with the first frame, making sure to drop them in the middle of the open document window and not to the side or on the main photoshop panel as this will open all of the frames on separate windows. So, drop them onto the open window with the first frame and this will create each frame as a new layer on the first frame document window. Or you can follow the steps for opening a stacked smart object using the ‘Script’ method and opening the images using the ‘Image Statistics’ dialogue box.
As mentioned, the techniques above (Smart Object – Stack Blend Modes) is also a great way to get noise free photos in low light situations when you don’t have a tripod to hand. If you’re in a situation where you would like to take a photo but the light is so low that you have to raise your shutter speed beyond the limit of the ‘focal length/shutter speed’ rule (If you haven’t heard of this rule it applies where, say you have a 50mm focal length lens, the rule of thumb is that you would ideally not want to have a shutter speed any longer than 1/50th second, or if you have 200mm = 1/200th second shutter speed and so on and so forth to reduce the risk of ‘camera shake’ (softness/blurriness in your shot) so hand held you only have one real option at your disposal and that is to raise the ISO for your shot, which in turn will leave you with a noisy/grainy photo. If you raise your ISO to a level where you can overcome the ‘focal length/shutter speed’ rule, then you can take multiple shots and ‘median’ stack them to remove all of the noise in your shot to give you a nice clean image here is an example showing a single high ISO shot full of noise/grain v 13 individual high ISO shots stacked together.
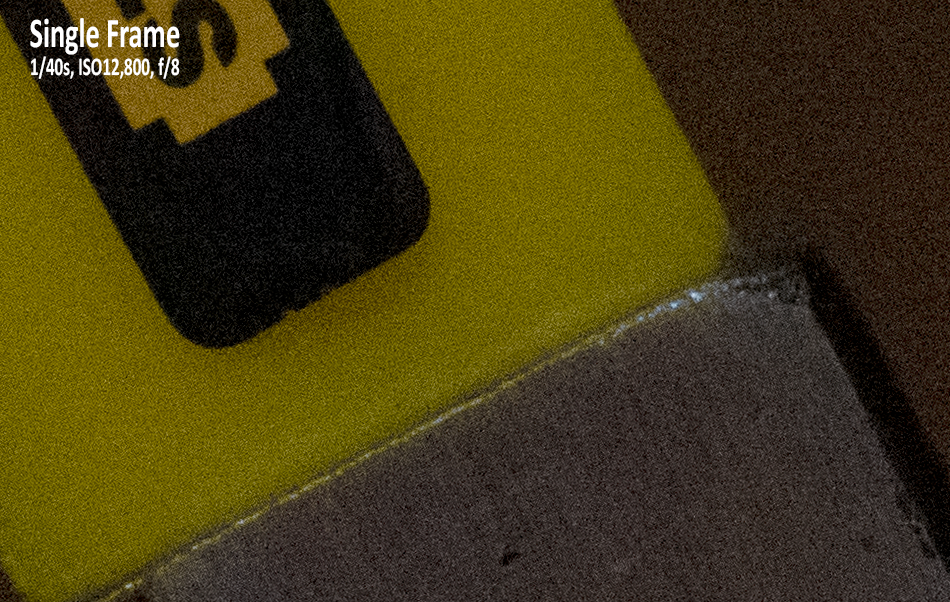
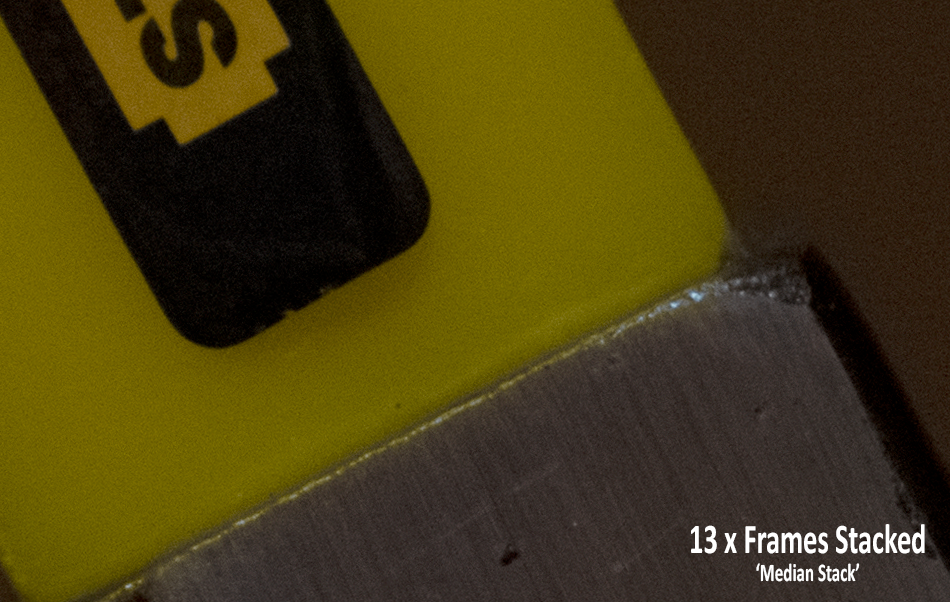
You’ll probably notice in this example just how much difference a single image is to a stacked blended smart object in terms of noise. In some instances, you may experience a slight reduction in sharpness as you can see in the 200% example, but a quick ‘Smart Sharpen’ (Filter/Sharpen/Smart Sharpen) or any other sharpening method and sharpen your image to taste, but to be fair at 200% zoom any level of loss of sharpness this minor will not likely be an issue when you come to print and very unlikely to be noticeable at all for online use. But an extra bit of re-sharpening doesn’t go amiss.
Bracketing in place of ND Grads
As I mentioned at the very beginning of this blog, I don’t have the financial freedoms to be able to afford a filter system so don’t actually have ND grads at my disposal, I did try and cheap out and get myself one of the amazon specials (I’ll not mention the name of the filter brand but I’m pretty sure you’ll know the ones I’m talking about if you’ve taken a similar route as myself in the past) they cost £30 or so for a full filter system, filter holder, around 10 filter thread adapters and around 8-10 100x150mm square filters. But they were completely un-useable to be perfectly honest, the colour cast was so severe on some of them that there was zero way to fix the colour shift in post that they produced. The ND grads were a little bit better than the NDs as they didn’t produce as much colour shift, but the resin was so cheaply produced that there was visible warping within the resin. Some people may not see or even care about the difference this would cause and I hope I’m not coming off as a bit of a glass snob, lol. But a great bit of advice in the form of a question I got when I first started out in photography and I’ve stuck by this and repeated on many occasion is, “why spend hundreds or even thousands of pounds on good glass for your camera only to stick a bit of cheap glass or plastic in front of it?” and this is so true! If you can afford good quality filters I would always and forever recommend that you did get them, you get what you pay for and with good quality filters comes with a premium price tag, but better to have good quality filters or even nothing at all than by degrading the image quality of your expensive lenses with a £1 piece of warped plastic.
Polar Pro
Lee Filters
Nisi Filters
Formatt Hitech
Breakthrough Photography
B+W
Tiffen Filters
Hoya
Gobe
All these companies make great filters and have some of the best reviews and ratings you’ll find online or in print. I can‘t say for certain which ones are the best as I’ve previously stated, I don’t have or ever owned a good filter system to be able to even review one let alone compare each brand, but these brands are some that have systems that I’ve coveted for quite a while. So, going off reviews and blogs that I’ve read while doing some research I would at the very least highly recommend looking at either one of these companies for your filter needs.
(Sorry, quick correction). I do have a few second hand circular Hoya and Gobe ND and polarizing filters and absolutely love them, both companies NDs have zero to minimal colour cast and none bar one of the Hoya filters has a slight vignette, that particular filter has a slightly thicker thread mount which is why it has the vignette, but not enough that can’t be corrected in post. These two companies are the only ones on that list that I’ve had personal experience with, I can highly recommend both of these companies for the quality of their filters.
Anyway, I digress! The purpose of this blog was to give some examples of what you can do when faced with a situation where an ND or ND grad filter would be handy to have but you don’t have one available. We’ve looked at how a polarizer is a really handy filter to have and is the only one (I can think of) that’s process can’t be recreated effectively in post processing, we’ve looked at recreating a mock long exposure with stacking and now we’ll look at Bracketing and HDR stacking or using simple layer masks in order to capture the upper highlights and lower shadows when trying to capturing a sunrise/sunset landscape.
Here we have a bracketed image of a sunrise at my local harbour, this was just a quick stop the car and grab a shot type situation. I didn’t have a tripod so had to shoot handheld, I took a 7 x +/- 1-stop exposure bracket for the left hand side of the shot and a 7 x +/- 1-stop exposure bracket for the right side giving me a HDR-Panorama of 14 shots in total. This widened the dynamic range above what the camera was able to capture meaning I could capture the harsh highlights in the upper portion of the frame as well as the deep shadows on the lower part of the frame without the need of a grad filter.
It doesn’t always have to be as complicated as taking loads of frames and creating a luminosity masked bracket sequence or an HDR photo that can sometimes look kind of garish (depending on the process you use to create your “HDR” shot).
But a simple way you can create a similar shot to what you can get from using a ND Grad Filter is to take a slightly under exposed shot and a slightly over exposed shot and use a simple layer mask between both shots in order to get a similar result to a grad filter, I say similar as in reality the masking option gives you so much more control over what a grad filter would give you in the field, this is more evident when you have a horizon that’s not straight or you have a building or tree breaking the horizon and protruding into the sky portion of the frame as the linier gradient of the grad filter will under expose the object that protrudes into the sky portion of your frame where as when you mask two bracketed shots you have the ability to mask whichever area of your frame you want to give a more even exposure overall. But if your horizon is relatively straight then you can just use the simple layer mask in the same way as you would a grad filter.
Here we have an example of a +1/stop exposure and a -1/stop exposure and a simple mask running down across the horizon This works out to the equivalent of a 3stop ND Grad.
And as you can see from this example the highlights are blown/clipped in the over exposed shot and the shadows are blown/clipped in the under exposed shot but by using the simple layer mask in place of the Grad filter I can process this shot making sure I have details in the Highlights as well as the shadows giving me the exposure below
It’s no secret to how our eyes work and how our eyes seem to take in more of a high dynamic range scene than our cameras can, when we scan a scene with our naked eye our pupil is constantly opening and closing depending on which part of the scene we’re focused on, so we look at a shadowed area and our pupils open allowing in more light to see into the shadows, when we look into a light/brighter part of the scene our pupils constrict allowing in less light so we can focus on the brighter part of the scene. Well this is exactly how the camera lens works, the aperture of the lens can be open more to allow light into the camera sensor to expose for the shadows or be closed more to omit light from getting to the sensor to expose for the highlights, but the limitation that the camera has is that it can only have one set aperture for each image, so you expose for the highlights with one aperture and expose for the shadows with another aperture (or shutter speed or ISO, that part is up to you) but that’s how we can see all the details in a lovely sunset scene with the naked eye but struggle to get that same scene with a single image. So that’s why Grad filters or Bracketing are so important when shooting sunrises/sunsets or any other high dynamic light range scene.
The bracketed panoramic photograph above consisted of taking 2 sets of bracketed shots set at 1/stop brackets and taking 7 shots for each set giving me 14 shots in total.
The 14 RAW files used in the Bracketed Panorama
To merge these into an HDR panorama I opened them in Lightroom, selected all of the frames, right click over any of the frames and select Phoro Merge/HDR Panorama.
If you’re not familiar with Lightroom this is the process for making panoramas, HDR’s and HDR Panoramas.
1.) Open up Lightroom and simply drag and drop your (1.) folder or files onto the middle of the Lightroom program window, this will open all your RAW images onto the import dialogue box simply select (2.) ‘Add’ and this will open your frames in Lightroom.
2.) When open in Lightroom it will open your files into the ‘Library’ window from here you can do some global adjustments with exposure but to do any lens corrections or local adjustments you will have to select the develop tab to open your frames in the ‘Develop’ module.
3.) Now in the develop module all you have to do is select all of your frames, you can do that by selecting the first frame then going to the last frame, hold down the shift key and select the last frame, this will select them all for you, alternatively you could use the hotkey to select all frames which is ‘Ctrl+A’ to select all frames.
4.) Once you’ve selected all your frames simply right click on any of the frames and a select photo Merge and chose whichever photo merge type that you need, Panorama or HDR panorama and this will bring up the panorama dialogue box.
5.) When you have the panorama dialogue box open, you’ll see three options for the type of projection that you want, for this shot I chose (1.) ‘Spherical’, I also like to set my (2.) ‘Boundary Warp’ to around 50% for most panoramas. (3.) ‘Auto Crop’ and ‘Auto Settings’ checked for this panorama but I generally don’t have them checked as I might have to do some further straightening of the horizon in photoshop, this is mostly for when you don’t have a level tripod and the frames are at a slight angle to each other or as is the case here when you shoot handheld panoramas you often don’t get the horizon line spot on in camera. Then just hit merge and your panorama will be stitched and opened in lightroom with the rest of your frames.
6.) Here you can see that the new panorama DNG (Digital Negative) file is opened in Lightroom along with the rest of your files as well as a copy saved to the folder with your original RAW files. You can further tweak the exposure from here or send to photoshop or other applications to work further on it.
Well that was a longer process than I thought it was going to be and all we really covered it two ways that you could still get similar results to two different filters but hopefully it’s covered enough to spark the imagination and let you see that just because you don’t have any filters in your camera bag that you can’t go out and capture similar results to those who do. Masks can cover any variation of Graduation Filters, hard Edge Grads, soft Edge Grads, Reverse Grads, in the same sense you can also replace Coloured Grads but using the colour to transparent Grads in both Lightroom and Photoshop. Fog filters and star filters can all be replicated using post processing techniques and of course we also touched on the one filter that I wouldn’t like to go without, The (CPL) Circular Polarizing Filter. Not only is it a versatile filter but as far as I’m aware is the only filter that can’t be effectively replicated in post processing.
I really hope this information was of any use to anybody that took the time to read it and if you did read this far on then a massive well done and thank you for having such patience, lol. I know I can go on a bit and not the most riveting person to listen to let along read from, so thank you once again. And if there’s ever anything at all that you want to ask about or rectify in any of the information above please don’t hesitate to get in touch with me on any of my page’s social media channels.
Facebook - https://www.facebook.com/dynamicscotlandphotography
Instagram - https://www.instagram.com/dynamic_scotland_photography/
Twitter - https://twitter.com/DynamicScotland
Or e-mail me on dynamicscotlandphotography@yahoo.com
Thank you so much once again and take care.
Sylvan Buckley (Dynamic Scotland Photography) dynamicscotlandphotography@yahoo.com




![2.) Find the frames that you plan to use for stacking. [Tip] If you notice here I’ve taken a photo of the lens cap at the beginning and the end of the sequence, This is not essential but really helps to find groups of photos to be used in a sequence either for stacking or for stitching in panoramas. It’s a good practice to take these marker frames as it saves so much time later when sorting through your photos](https://images.squarespace-cdn.com/content/v1/611e481a3b0e7c6c9163f937/1633019119848-Y56UAO3ONP82K2S60VO6/step+by+step-stack_0102_find+frames+to+use.jpg)


